Tuesday, December 18, 2012

A Finish the Face Final

It's final time.

Here are some work samples from Art 1 students.

Boy do I love not having to grade essays!!


Student Flowers

My previous post had the process.
Here are some samples of my student's work.

All of these are Art1.

Lots more to see in the gallery. http://www.artsonia.com/museum/gallery.asp?exhibit=589506

I really like how the project turned out. I think it's a keeper!


Tuesday, November 20, 2012

Colored Pencils+Gamsol+India Ink+Oil Pastels

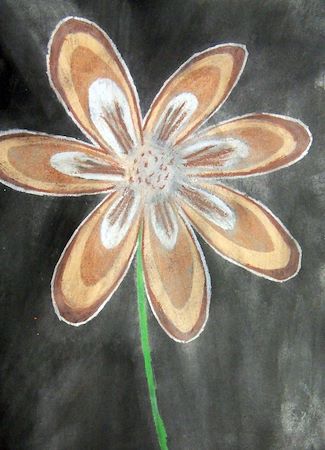
When I left for TAEA (Texas Art Educators Association) Convention, I had my Art 1 students working on drawing a silk flower from observation. My idea was to have them do a watercolor/glue project in an O'Keeffe style.
 
However, while at convention, I went to a class on colored pencils and india ink. Well, in the class we used beautiful Lyra pencils. Beautiful=Expensive. I don't have these, nor do my students. So I had to punt. In doing so, I have created a project that I have fallen in love with!
 
Here are the steps.
 
1. Do a contour drawing of the flower. I did birds-eye view for this sample piece.  Fill the page. 
 
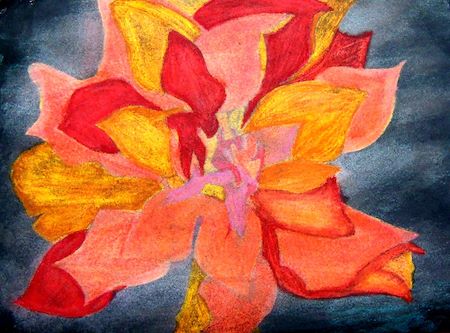
2. Color. Lots and lots of color. Use a lot of different shades and build and build color. Go in different directions as you fill in the color. 
 
3.Keep building.When you think you have enough shades, keep going. My flower has at least 10 layers of colored pencil. (for the record here, I used prismacolor pencils.) 
 
4. Take a brush and some odorless mineral spirits (I used Gamsol) and brush on. When you do this, the lines of the pencil bleed together and look painted. (This is not a new technique!)
 
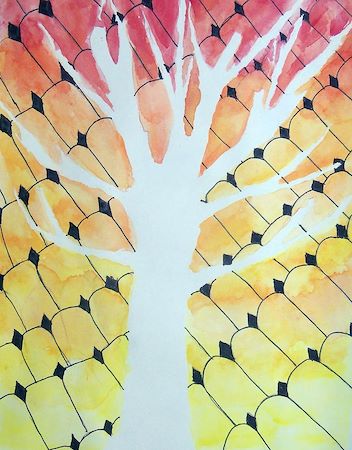
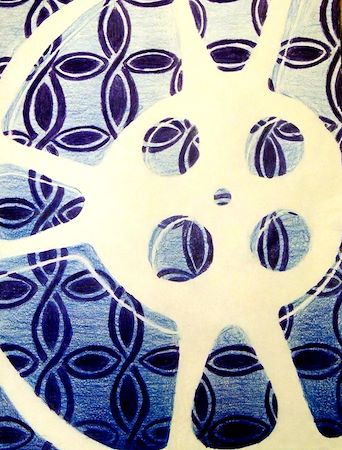
5. Now take the india ink and sponge on the back side of the paper. (I used a kleenex and just swiped it on it.. that's what I had available). Cover the entire paper.  Flip over and do the same thing. Yes, even cover the flower.  After you cover the entire paper, using a cotton ball (or kleenex for me..) wipe the flower clean. This will bring back your color, but leave the texture of the ink.

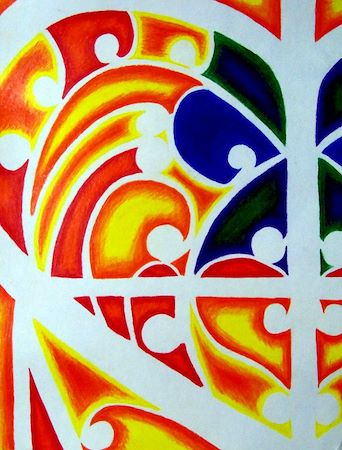
6. I felt like my colors were too muted at this point, so I started playing. I layered more colored pencil (prang this time, hoping for more wax) and built up a few more layers of colored pencil. Then I did the Gamsol again. Then I still wasn't thrilled, so I after considering my options, I settled on my Cray-Pas. And I love them!

In this picture you can see where I put the oil pastel down on a couple of leaves and then you can see where I used the Gamsol brush and smoothed out the color.

 
7. And that's the project. The finished piece looks better in person I think. It looks more like the above picture and is vibrant. I'm already thinking about the next project!

I think overall, this will be a successful project with my students. It's not expensive and that is huge and it uses easily found materials.

I can't wait to show you what my students create!

Wednesday, November 14, 2012

Sumi-e Painting or Ink Wash Painting

Sumi-e Painting.

It's making ink from an inkstick (block of soot) and rubbing it on an inkstone and then painting with a bamboo brush on rice paper.

It's fun and not our usual medium.

It's part of my quest to make sure that advanced art students leave my program with experience in as many different types of art and media as possible.

In Sumi-e, once it's painted on, it's on. You can't change the stroke or erase it. I have found that it's a great exercise for students to use with gesture sketches.


We also did the traditional flowers, birds and bamboo.


While we were doing this, my art 1 classes were working on contour line with soda cans, so we did those in sumi-e too.

Overall, these are good exercises, but I don't like the way they dry when you have to create digital files. Maybe if I ironed them? I don't know. Can you iron rice paper???

Pastel Portraits

Art 2 and AP Studio students spent a few days drawing each other and then drawing themselves looking in mirrors. One day, while they were working, I had the students take pictures of themselves looking in the mirror so that we could capture the moment.

I then printed the pictures in black and white and gave them to the students to create a pastel portrait. The students could choose between chalk pastel and oil pastel. I pushed the students to try the one they were most unsure of.

The results were mixed. Some students were so caught up in the fact that they had not mastered the pastels that they didn't do great portraits. Some students found a new passion.

Here is the link for the artsonia gallery http://www.artsonia.com/museum/gallery.asp?exhibit=561134 

And here are a few quality examples.


Positive and Negative Shape Project

I realized that I never posted any of the finished Positive and Negative Shape projects. As you would imagine with Art 1, some students did fabulous and some struggled. All finished projects are posted on my artsonia site. http://www.artsonia.com/museum/gallery.asp?exhibit=563730 

Here are a few of the varied projects. I really like this for an early in the year project. I like that it focus on shape, but give students a chance to play with color. I also see very quickly which students are going to be able to draw from observation and which students are going to struggle.

The basic assignment is to draw the negative and fill with a color and pattern. The object is supposed to touch all four sides of the picture plane.


These projects have been digitized, uploaded to artsonia, been displayed in an artshow and are now on their way home to mom. Love this kind of project!

Fall Art Show Rap Up

The Fall Art show was a great success.

More than that for me at this point, it's done!

We had over 300 pieces of art displayed including 30 packing tape sculptures.

Here is a picture of me (taken by my 3 year old...)

And here is some of the art. The packing tape sculptures were fun to make and all the students were totally engaged everyday. Wow.


Thanks for stopping by our exhibit!

Wednesday, October 24, 2012

Going the extra mile for my students!

We are making packing tape sculptures this week.
Here I am going the extra mile by being the model!
(we are wearing red today to say NO to drugs...)

Tuesday, October 16, 2012

keeping it real

Often times we teachers only want the world to see the good stuff that we do. Heck, bloggers in general only want to blog about the cute things, not the meaty stuff!

With that in mind, and working to update my student's Artsonia accounts more frequently, I decided that instead of just posting the "quality" pieces, I want to post the progress! The vast majority of my students have never had an art class and don't have even the most basic knowledge of art principles or practices. Because of this, I think it is vital that we celebrate all work and watch the progress, not just applaud the pieces that we would deem to be quality art projects.

So in an effort to keep it real.... I have already posted 157 student created drawings. Many are sketchbook assignments and most of them would be considered not really worthy of posting, but I am proud of the work that my student's do, so I am displaying it publicly for them and their families!

Here is a sampling of the work we have done so far this semester....

Every Wednesday sketchbooks are due...

Art 1 is drawing pears.
http://www.artsonia.com/museum/gallery.asp?exhibit=553329
 

Art 2 is drawing hands.
http://www.artsonia.com/museum/gallery.asp?exhibit=553583


Most recently we have worked with shape and form.
We did Geometric Object Drawings:
http://www.artsonia.com/museum/gallery.asp?exhibit=554325

 
Students drew the geometric objects for a few days and then we moved onto other objects. We are currently making a positive and negative shape drawing/painting.
 
I'll post completed project photos soon!
 
Art 2 and AP are hard at work as well. I'll post some of their work soon too!

Saturday, October 6, 2012

Sunday, August 26, 2012

Monday, July 16, 2012

Summer Projects

Hey Art 2 and AP students, check out your pages at Summer Projects have been posted.

Yes, I know it's July.. but you can do some of these anyway!!

And if you don't, no worries, you can do them once school starts!

Friday, July 13, 2012

Crazy Blogger

So I wanted to be able to post all kinds of cool lesson plans complete with the documents that go with them.  You know, things created in notebook software and microsoft office software.  But, so far, I can't figure out how to post.  And I really didn't want to have to start from scratch on a website :( So if you have any ideas, let me know.

Wednesday, July 11, 2012

Working

There is no real content here yet.
I'm sorry.
But, I'm working on it!!

Here are a few pictures of my students hard at work last fall.


Check out my personal blog for past projects, fun crafts and mildly amusing things about me and my family. http://www.faithhopeandart.blogspot.com/

And come back soon! My goal is to be up and really running by August 20, 2012.